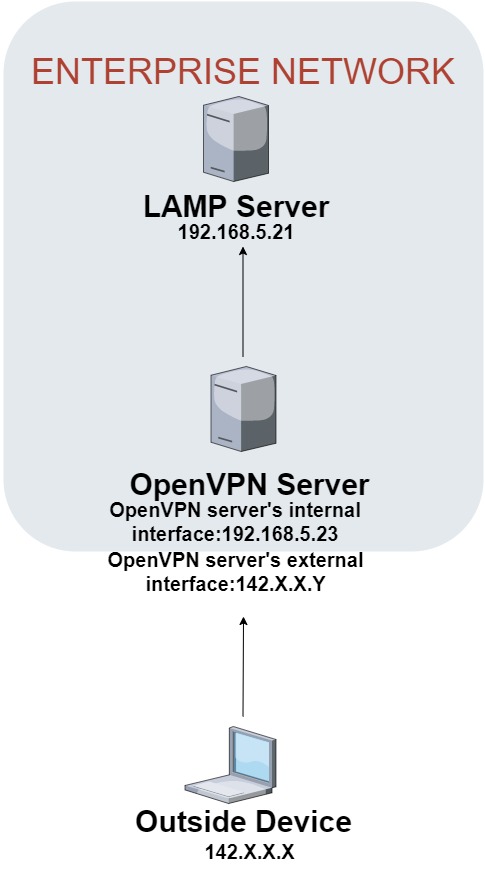
This is the documentation for my OpenVPN deployment in my homelab. The topology consists of three virtual machines: one OpenVPN server with two network interfaces for both the internal network and the external network, one LAMP server inside the enterprise network to represent a server/machine inside in the internal network for testing purposes and one outside device as the OpenVPN client in the external network to connect to the OpenVPN server.
Diagram:

Setup –
OpenVPN Server: Linux Mint 20
OpenVPN Client: Debian 10
(Optional) Server with a LAMP stack inside the internal network
OpenVPN Server instructions
Installing OpenVPN on Linux Mint
sudo -s
wget -O – https://swupdate.openvpn.net/repos/repo-public.gpg|apt-key add –
echo “deb http://build.openvpn.net/debian/openvpn/<version> <osrelease> main” > /etc/apt/sources.list.d/openvpn-aptrepo.list
apt-get update && apt-get install openvpn
Copy the OpenVPN directory to another directory for editing
cp -R /usr/share/doc/openvpn/* /etc/openvpn
Download and make OpenVPN easy-rsa directory to generate CA (if OpenVPN version is higher than 2.3.x)
sudo apt install openvpn easy-rsa
sudo make-cadir /etc/openvpn/easy-rsa
Generate the master Certificate Authority (CA) certificate & key
./easyrsa init-pki
Generate Diffie-Hellman key for key exchange
./easyrsa gen-dh
Create CA Signing Authority
./easyrsa build-ca nopass
Generate server certificate files
./easyrsa gen-req champServer nopass
Sign the server key using CA
./easyrsa sign-req server champServer
Verify the created certificate
openssl verify -CAfile pki/ca.crt pki/issued/champServer.crt
Copy all required files to /etc/openvpn/server directory
cp pki/ca.crt /etc/openvpn/server/
cp pki/dh.pem /etc/openvpn/server/
cp pki/private/champServer.key /etc/openvpn/server/
cp pki/issued/champServer.crt /etc/openvpn/server/
Create a server.conf file in /etc/openvpn
nano /etc/openvpn/server.conf
Inside server.conf
port 4443
proto tcp-server
tls-server
mode server
dev tun
ca /etc/openvpn/server/ca.crt
cert /etc/openvpn/server/champServer.crt
key /etc/openvpn/server/champServer.key
dh /etc/openvpn/server/dh.pem
push “route 192.168.5.0 255.255.255.0”
ifconfig 192.168.5.85 192.168.5.86
ifconfig-pool 192.168.5.90 192.168.5.95
client-to-client
status /var/log/openvpn/openvpn-status.log
log /var/log/openvpn/openvpn.log
log-append /var/log/openvpn/openvpn.log
purposes
verb 6
Start the OpenVPN service
systemctl start openvpn@server
systemctl enable openvpn@server
Check OpenVPN status
systemctl status openvpn@server
Verify tunnel interface
ip a show tun0
Enable IP Forwarding
sed -i ‘s/#net.ipv4.ip_forward=1/net.ipv4.ip_forward=1/’ /etc/sysctl.conf
sysctl -p
Verify IP Forwarding:
cat /proc/sys/net/ipv4/ip_forward 1
Create route from client to internal network
route add 192.168.5.90 dev tun0
Generate Client Key
./easyrsa build-client-full champovpnclient nopass
Move the client key files to /etc/openvpn/client directory
- ca.crt (in /etc/openvpn/easy-rsa/pki)
- ClientKey.crt (in /etc/openvpn/easy-rsa/pki/issued)
- ClientKey.key (in /etc/openvpn/easy-rsa/pki/private)
OpenVPN Client instructions
Install OpenVPN on Debian 10
apt-get install openvpn -y
Permit Root Login in the /etc/ssh/sshd_config file on the server
**Make sure SSH is working properly on both server and client
**Required files:
- ca.crt
- ClientKey.crt
- ClientKey.key
Secure copy client key files from the server (make sure you are in /etc/openvpn)
scp -r root@Server’s public IP:/etc/openvpn/client .
Create a client.config file (in /etc/openvpn/client) to connect to the server
client
dev tun
proto tcp-client
tls-client
remote Server’s public IP 4443
ca /etc/openvpn/client/ca.crt
cert /etc/openvpn/client/champovpnclient.crt
key /etc/openvpn/client/champovpnclient.key

If using two NICs on the server proxy arp is needed
echo 1 > /proc/sys/net/ipv4/conf/all/proxy_arp
or enable permanently, add to sysctl.conf
net.ipv4.conf.all.proxy_arp=1
Connect to OpenVPN server
openvpn –config client.config
The client’s tunnel interface (tun0) is up and running

The client is able to access the LAMP server inside the internal network
All in all, this was one of the most interesting projects that I went through and built for myself. Going through this project and the troubleshooting process that came with it taught me quite a bit about how IPSEC VPNs work as well as learning more about how the Linux operating system processes networks.